
An Examination of: GVM: FH400B “Flathead” 400w Bi Color LED
Author: Timur Civan
Original Post: https://timurcivan.com/2025/10/an-examination-of-gvm-fh400b-flathead-400w-bi-color-led/
Republished with permission.

Welcome back!
In this installment, I’m gonna take a quick walk through the GVM FH400B BiColor 400w LED light. It’s become the backbone of my lighting kit. I don’t write about lights too often, unless its something of note.
I got introduced to the folks at GVM LED about a year ago, they showed me a prototype of what I thought was a really innovative design. What became the FH400 “Flathead” LED. So, I asked them if they needed any help testing and developing their line of new pro lights. A few months ago around March 2025, they sent me some prototypes to test and the the light itself, the engine, the brightness, color etc… it’s great. On par with everything you would expect from any other professional LED light. I’d even say they seem to be a touch brighter per watt than some of their competitors, and the lights on my shelf.
This is their first foray into professional cine lighting. I think they are off to a VERY interesting start.
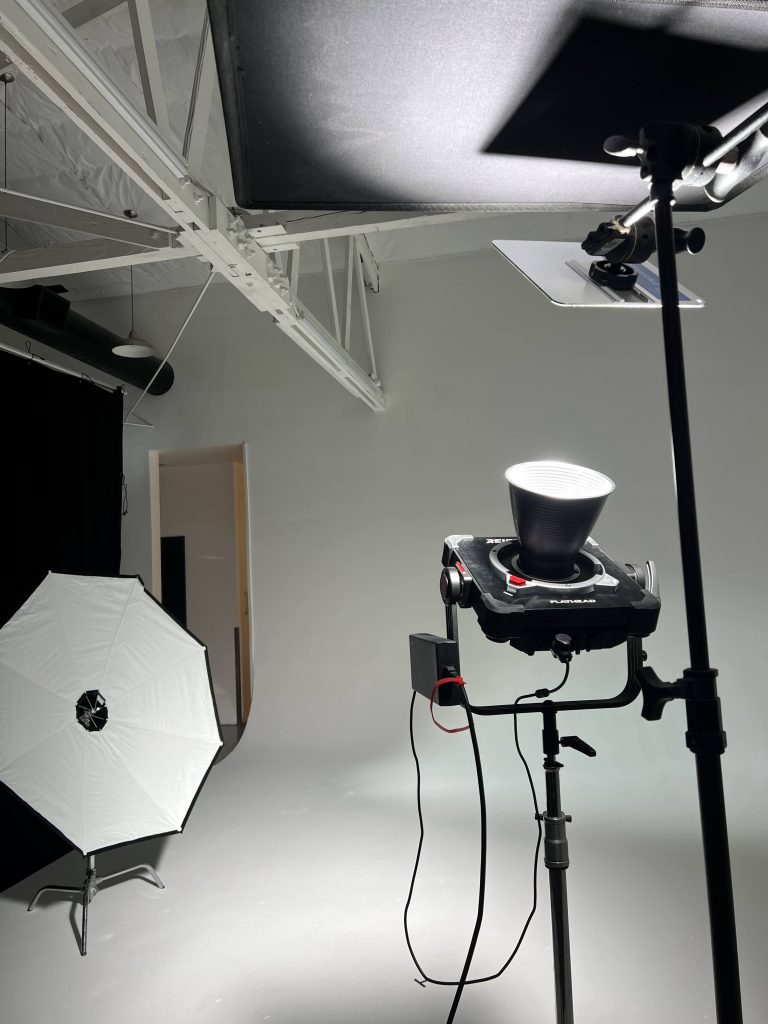
What makes it stand out is the design. They are shaped more like a 1×1 panel light than a traditional COB style LED. At first its a bit different. Nothing is truly wrong with the traditional Monolight, style LED design. That is until you actually live with the FH400 for a while. So now, about 8 months later, I feel like I know enough about them in day to day use to have an actual opinion. The form factor, engineering and small ergonomic details all add up to something more.
Pros:
1: The designers and color science engineers worked hard to maintain adherence to color quality and accuracy. They are consistent, color accurate and very efficiently use their 400w draw. At 5600K on the light, it metered at TLCI 99 and a 5624K color temperature. Only a 24 Kelvin variance from indicated on the light color temperature to the metered temprature. You can also see the a sub 1/2 point Green bias of 0.4, Commendable performance. The R9 chip of the standard CRI scale shows 86.8 saturation, which means the red channel is healthy and likely what contributes to the good TLCI rating. This means that the redchannel is pretty good, and will render good skin tones.


In 3200K mode:
Again, 1/2 point green bias, which is very mild. In “Tungsten” it produces a TLCI of 97 ( manufacturers claim of 97 TLCI, though in daylight it out performed the claims). The light was set to 3200K and metered at a 3285K A touch cool, but anything thats metering within 100K between the dial on the light and a color meter is very good performance. The increase of the R9 chip reading, the red channel reading is up to 96 in Tungsten mode. Thats a good saturation that mean the red channel output is healthy. The FH400 is producing for the most part, the color it says it is.


2: They seem to be able to get so much relative output because the cooling of the FH400 platform allows for the entire unit to be a heat sink and house a massive fan that runs at low speed. Low speed fans mean less fan noise. Think about it, whats better? a 4″ heat sink stacked into a small tube with a small fan screaming to move enough air, or a 12″x12″ heatsink with a giant fan running slowly? That cooling power is where the FH400 shines. It can perform efficiently, and optimize its light engine’s performance.

3: You can use the lights individually, or in an array. They designed the lights and an accessory yoke to able to stack together, becoming essentially like a “9 light” style multi pod. Though its actually 6 lights, or 4, or 2 units, depending on how you choose to build it and which yoke you get. Each light is still powered individually and has a cable management system on the back for the AC power bricks. The benefits are, say, using the 6 light configuration, you now get 2400w of power available in one unit. However, because each light is its own stand alone unit, you can run it in a household environment. No need for a tie in. You split the plugs across two circuits with 2 stingers. You can use the same method with a small 3000w genny, or battery inverter, across the circuits built in. There is another benefit here to using smaller units to make up a larget unit. Most LEDs that cine lighting manufacturers use have point where the efficiency of light output vs power draw/heat, plateaus. It is somewhere around 400-600w. The issue is combination of phosphor stability and heat management. In essence, as you are now running 6x 400w units, that 2400w of power is being converted into lumens at the peak of their power efficiency. Remember, the cooling, and the giant heat sink? It pays off here. You’re getting MORE overall photons than one single 2400W giant LED cob can provide, because it can cool itself more efficiently when spread out across individual units. You can also break it down piece at a time, and siphon off units as needed. If you only need 4x, just take out two, and use those two elsewhere on set. It does of course take a minute to assemble and manage cables, but once you do it once or twice it can be fully assembled from cases to complete in about 15 minutes. You can then attach any bowens mount accesory you choose like the intensifier optics, reflectors, small diffused white globes etc. You use it like a traditional multi unit. Pushing through a 12×12 diffusion, or a frame with some diff. Its great for night exteriors lighting up large swaths of background or talent from a distance. It’s not going to replace a 12K HMI par…. But if you have enough of the FH400 lights in your kit, being able to build a beast of a unit is for the times you need it is pretty awesome. This configuration can definitely fight the sun, for location or daylight interiors. I’m interested to try it in the 6 light configuration, outdoors at night while using high ISO cameras. Imagine putting it on a crest line, cherry picker or top of a building, and backlighting a large swath of street or nature. When shooting at 12800+ ISO like you can these days, it can help make a set up look bigger than it is.

4: They have mounting points! The light has 3/8ths mounting points on the back! Rigging it for awkward spaces and process trailers is now so easy! Plus the flat shape, lets you tuck them up flatter and further back than you could with a traditional monolight style LED. The points appear to be steel inserts embedded into the aluminum frame. This is kind of a big deal for process trailers as you can only set your lights out away from the car a certain amount, usually the edge of the trailer. DOT doesn’t like things sticking out too much. Gaining 4-8″ if additional distance, helps you with the diffusion, light fall off, and offers more options for light placement. And honestly, even a wider frame on the lens. A few inches on either side means more flexible framing options.

5: G7 Mount: In addition to a standard Bowens mount for mounting lighting modifiers, the designers created the proprietary G7 mount. Bowens mount adapters were designed for strobe lights, that had a protruding flash coil on the face of the unit. COB style LEDs, are “flat” and don’t stick out. They tend to sit too far back to make the most of the Bowens style modifiers you put on. Beauty dishes, octo banks, etc… The G7 mount, is designed with this in mind. It provides the appropriate light collecting angles for a flush light emitter. GVM makes a large intensifier in G7 mount, its like a silver cone shaped parabolic modifier. It essentially focuses the beam, and collects all the lumens and focuses them in one super intense beam of light. No optics, light weight etc. Makes the 400w light feel like a 600 or 800. Gobs of intensity. I don’t know what else they have planned for the G7 mount, but I’m told there will be lots of additions. Spot light adapters and various kinds of intensifiers of different beam angles in the G7 system.

6: High speed performance: I tested them on a Phantom Flex 4K. They were flicker free up to about 800fps. After that you started to see some mild artifacts. ( i’m told future versions will be completely flicker free) Though, in all my days of tabletop cinematography, I can count on my hand how many times I’ve gone over 800fps. So for most things, they would be more than enough. If you need extreme high speed, in the 1000+ FPS range, I would switch to 12K/20K tungsten units anyhow. For the vast majority of shoots, we are shooting 240FPS to 480 Fps on Vraptor, Ember or Flex. Now with the Arri Alexa35 Extreme, and its 660 FPS capability, we are still within the flicker limit of the light. Plus once you go that high, you need a bit more power than a 400w led can provide anyhow.
The FH400’s benefits to my workflow has broken down like this:
Storage / Transport:
On Most shoots, camera, lighting, lenses, camera support, grip and electric all has to ride along with me. I have a home studio I work out of for the most part, but on occasion I have to pack it all into my “custom” SUV. By custom I mean, I removed all the seats and center consoles from a Toyota Sequoia, so it’s basically a small moving van. Despite being incredibly spacious on the inside for a human, its a lot of equipment to carry. Camera, Lighting, Grip, Camera support and often set pieces too. The table surface, backdrops, art elements etc… So for me, SPACE savings is the name of the game.

Thats where the FH400 comes in. You get the compact packability of a flat 1×1 LED softlight, with the flexibility of a COB light. I have a few cob lights, and the issue with them was always that once packed into its case, its the large chunky cube. Extrapolate that across 4-5 lights and suddenly you’re gobbling up precious space in the studio as well as my truck. The FH400 with its unique shape, means that I can stack 2 of them in a crate, with the yoke and power adapters. So 2 lights takes up half the space of one of the single cases. Put a little foam protection, in there and you can carry an entire sets worth of lights in three milk crates. This applies to the studio as well. The square shape has a side benefit. They can stand up on their edges. I line them up on the shelf. The “Lighting unit section” of my storage shelves just compressed into 1/4 the space. As we filmmakers all know, no matter how much space you have, its never enough. I currently have 2 of the FH400’s but I’m about to switch over my older lights to an additional 4, making 6 altogether, so I can eventually build the 6 Light configuration I discussed earlier.
Usability:

Weather Rating:
The FHseries has IP65 Rating on the head. Taking it out side is no problem in the rain. Take basic wet weather precautions with all electrical distribution regardless of the light. Safety first.
Ellipsoidal adapters:
What makes the unit unique is that, the designers incorporated a quick release yoke system on the sides. Its sort of like a Vlock for a battery. I use it pretty regularly without the yoke. I have an Ellipsoidal adapter, ( a Leko adapter), and as we all know using ellipsoidal on a traditional tubular design LED is a nightmare, because they are so heavy they require a separate yoke and stand to support them in front of the lighting unit, as the front weight throws the assembly off balance. The FH400, being flat, and with a removable Yoke, puts the center of gravity essentially around the bowens mount itself. So you have almost no leverage on the mount. Without excessive weight hanging either out back, or out front, you are not stressing the stressing the mounts and throwing it off balance. The yoke of the Leko adapter, becomes the mounting point and the front heaviness of the adapter itself, balances the FH 400 perfectly. Never has using a ellipsoidal adapter been so straight forward and easy. Its like having a normal… Leko…. in the case of the FH400B ( bi color) with tunable intensity and color temperature and a lot more power. If you opt for the FH400c ( RGB version) you get all the benefits of an RGB light with extra tune ability for color quality in white light. The overall package is so much more affordable and more powerful than the dedicated ellipsoidal lights from Source Four. You also don’t get the dreaded LED cob projection artifacts. The FH400 has a frosted cob that diffuses the output, and makes for a clean even beam. You can of course use it traditionally, as mounting from the adapters yoke does put some limitation on your tilt up ability. Switching is quick.


Mounting:
The unique shape offered the engineers some real estate to work with. They put 3/8th threaded holes on the corners. You can use them for anything. You can thread in a eyeloop and have a safety chain, or screw in pins and use them to rig the light anywhere. As I touched on earlier, I would absolutely use these in a car rig, as the flat shape means you can back the unit a few precious inches further back away from the vehicle.

GVM also made an accessory that mounts into the light to let you rig it directly to a pipe grid, with no yoke. This configuration, buys you back about a foot of height as they sit within the pipes at their level. They don’t have to be under slung or over slung like a traditional light. You however CAN use the yoke and mount them traditionally, for the ability to point them where you like. But thats the point, you get a clean tight option for a down light, or a flexible option that operates like you are used to with the yoke attached and mounted to pins. So you don’t have to worry about the light torquing or sagging over time. Its two points of contact and very secure. Great for long term studio work, but you get the benefits of a “hard” source or you can attach any Bowens mount light modifier, or hang diffusion under them. The pipe adapter is also very useful if you want to make a lantern light on a menace arm with a Bowens lantern accesory. The direct mounting to the speed rail, removes weight without the yoke, and is very secure. Side benefit, is that it also can rig discreetly to pipe, so they can be included in the frame as set elements without the mess of a Cstand in frame.
DMX +:
The light uses a swappable DMX, Bluetooth and Wifi light control board interface. You can choose how you want to control them, and select that board and swap it in. For studio use this is great, cause you can make it work with the system of your choice. You can use traditional wired DMX, or any number of wireless control systems.

The available modules are:
– BCM-NA – Bluetooth Module ( for most app based lighting control)
-BCM-XLR5 – This is a combination of Blutooth Connectivity and XLR DMX wired control ( As my lights are BT/ app controlable, I think this is the stock module)
-DCM-XLR5 – This is their standard DMX wired module, pictured above.
-CCM-XLR5 – This a combination of CRMX and XLR DMX
-LCM-RJ45 – This is the network port (ethernet cable) Module.
You can make it work within your existing ecosystem, or build out a system of your choice. The FH400 can grow with your setup.
CONS:
The bad…. there is some of course.
1: I’m not a fan of the power brick. Though they did make it easy to mount on the yoke of the light, or on the back of the 2/4/6 multi pod light yoke. The cables are plenty long, and they don’t really get in the way, but I’m hoping for a V2 soon, that has a more elegant power brick, thats maybe a bit smaller, or has a different cable for the power connection to the brick, its currently an OSHA cable connection. The connection to the light is XLR style, and is secure.

2: The BiColor version does not have a +- Green function. They made the light “neutral” out of the box. Accurate color is coming out. But thats not why we use +- Green…. We use it to match to other lights, and the environment. It’s not so much about correcting a flaw in the light, as it is, matching the flaws in other lights. If you’re shooting in a florescent lit factory or store, and you need a little green to match, its convenient to have it in the light. I think this will be addressed in V2. Rosco makes color correction gels for a reason. Its not the end of the world, but it would be nice if it had it.
Some Images i shot or lit, exclusively with the GVM system:
Shot as demo for ARRI’s Alexa Extreme: Shot at 660 FPS
For the launch of Leitz Cine GmbH, HEKTOR lenses:
I did the lighting for this photo project for the New York Times for photographer Devin Oktar Yalkin, of Senator Alex Padilla:
I used the FH400 as well as a GVM AIO 1200b w/ Elipsoidal and LightBridge CRLS reflectors. The main point being that, they had enough output to allow Devin to shoot at the Fstop & ISO he desired, and a shutter speed that gave him sharp pictures. Without having to use strobes.


Overall thoughts:
This is the first set of lights that have come across that had a sense of modularity in form and function. These days, we have to be flexible, and adapt to any situation that is thrown at us on set. I like the FH400 series because its a system of lights that gets out of my way in the studio, storage rack, and in transport, but can expand into what ever I need it to be on set. The FH400 of course, also performs very well in terms of color and output.
One of the biggest benefits is that they are priced aggressively against their competition. For example, a major ubiquitous 400W competitor, is about $1000, the FH400 is about $750. Considering the good build quality, great light performance, and most important to me, the unique modularity and flexibility of the light, I think the FH400 is a pretty great option for people looking to build out a new studio, build up a rental LGE van package, or make a compact travel kit. Being about 25% less, you can save enough money to either stetch for the “extra” light, or have some room left for more grip and support gear thats always necessary when making a lightning investment. This is basically what I’ve done with my studio/SUV package. Saving $500 on the units, allowed me to add in the Elipsodal adapter and an extra rag for my diffusion frames.
For what I am doing, I think the performance to value ratio is high. I think a lot of other folks will feel the same.
Thanks for reading!
0 comments